GUI Tutorial
Welcome in GUI Tutorial! Here you will learn how to write GUI applications using U++ library. All code mentions in this tutorial is cross-platform. It means it works exactly the same on a different operating system. Moreover, examples attached in this tutorial are bundle with U++ standard distribution, and they are localized in tutorial assembly. So, you don't need to rewrite it by yourself. Good luck!
Table of contents
1. First steps
1.1 Creating GUI application project from template
1.2 GUI application main function
2. Application window
3. Modifying TopWindow properties
4. Painting the view area
5. Reacting to input events
6. Multiple main windows
7. Menu
8. Context menu
9. Context menu alternative
10. Adding images
11. Toolbar
12. StatusBar and decorative Frames
13. Adding child Ctrls - widgets, reacting to widget events
14. More about logical coordinates
14.1 Explanations
14.2 Minimal window size
15. Font-zoomed logical coordinates
16. Layouts
16.1 Referral implementation
16.2 Upp namespace agnostic implementation
17. Value of widget
18. Accepting and rejecting widgets
19. Widget edit status flags
20. Breaking the modal loop
21. Creating and using custom widgets
22. Non-modal dialogs
23. Refreshing the UI periodically (time callback)
24. Internationalizing applications (i18n)
1. First steps
1.1 Creating GUI application project from template
Before we start writing GUI applications, first we need to learn how to create U++ GUI application from template. As described in Getting started with TheIDE tutorial, let's start from invoking "Create new package" dialog. First of all let's select assembly in which GUI application will be created. For now, MyApps assembly seems to be a good starting point. To create the package you could click on "New package" button or right click on package list and then select "New package..":
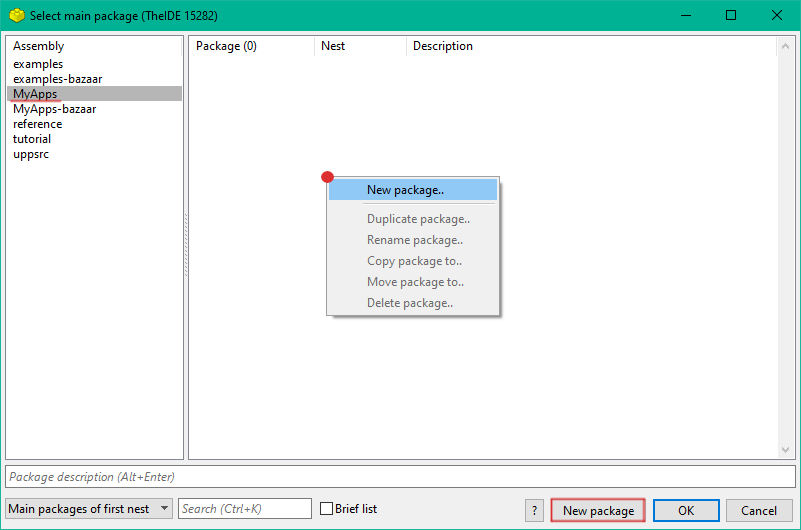
After that the dialog in which the package could be created should appear. In the dialog we have several options: The first one is "Package name" in our case let's name it "Gui01" for our first lesson. "Create in" should stay the same we would like to create package in MyApps directory. Next we need to select the package type. It is a very important step, because it will determine the dependencies of your further project. In this case we should focus on two particular templates:
U++ Basic CtrlLib application - creates package with main GUI function and dependency to GUI packages (uses CtrlLib).
U++ CtrlLib application with main window - posses some advanced GUI creation options such as adding separate window class and layouts. Good option for persons how finish this tutorial and know basics.
"Package description" in this case is optional. "Create new package" dialogs is shown below with selected template for GUI applications:
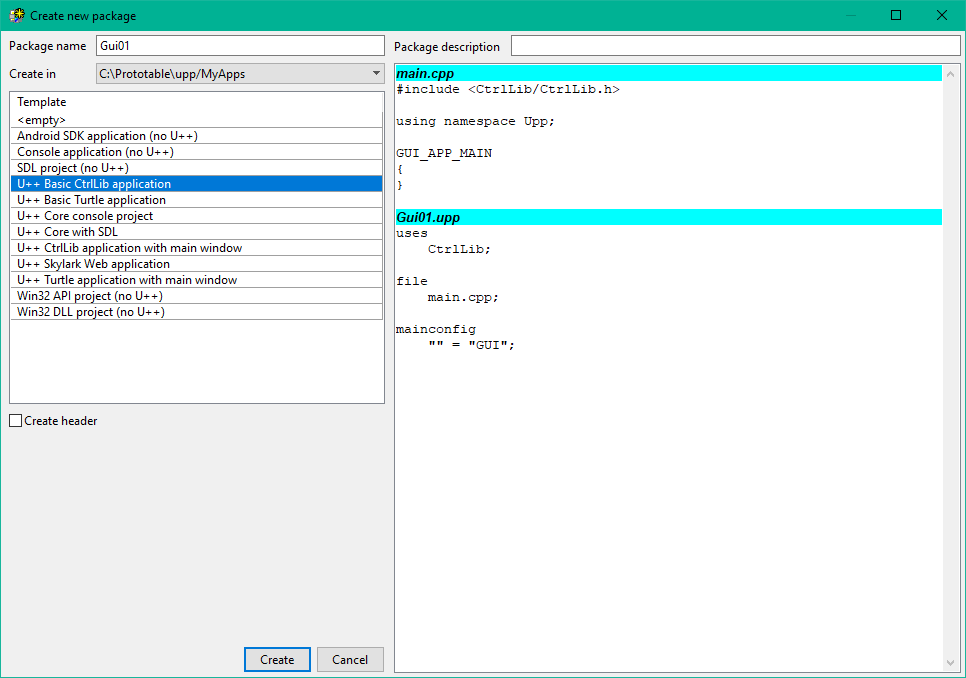
Now let's click on "Create" button and GUI project should be created.
1.2 GUI application main function
After creating GUI package, let's move to the coding part. To hide platform specific differences, U++ GUI application main function is defined using GUI_APP_MAIN macro:
#include <CtrlLib/CtrlLib.h>
using namespace Upp;
GUI_APP_MAIN {
PromptOK("Hello world");
}
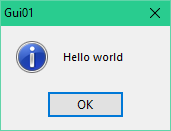
PromptOK function displays simply information dialog with the given parameter (in this case "Hello world").
To use U++ GUI related code, all you need to do is include <CtrlLib/CtrlLib.h> header. Please also make sure that CtrlLib package is attached to your current project. This is very important step if you didn't use GUI template to create your project or use empty one.
2. Application window
Application top-level windows are of TopWindow class. You can run modal event loop for TopWindow using the Run or Execute methods. Both methods open the window if it is not yet open (you can also open it using Open or OpenMain). Unlike Run, Execute also closes the window at the end of modal loop. TopWindow is also closed by destructor.
#include <CtrlLib/CtrlLib.h>
using namespace Upp;
GUI_APP_MAIN {
TopWindow w;
w.Run();
}
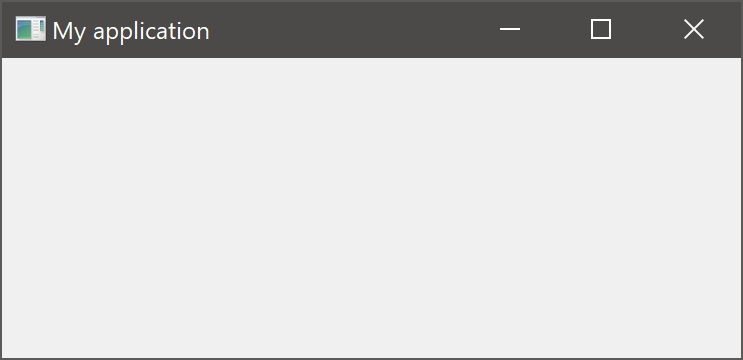
3. Modifying TopWindow properties
You can modify properties and behaviour of TopWindow using "modifier" methods. Note that modifiers usually return *this as return value, which results in simplified syntax. You can also setup the size of TopWindow using SetRect (note that unless instructed otherwise, U++ will center the position of window).
#include <CtrlLib/CtrlLib.h>
using namespace Upp;
GUI_APP_MAIN
{
TopWindow w;
w.Title("My application").Zoomable().Sizeable();
w.SetRect(0, 0, 200, 300);
w.Run();
}
4. Painting the view area
In order to display something inside TopWindow view area, you have to create derived class and override Paint method:
#include <CtrlLib/CtrlLib.h>
using namespace Upp;
struct MyAppWindow : TopWindow {
void Paint(Draw& w) override {
w.DrawRect(GetSize(), SWhite());
w.DrawText(20, 20, "Hello world!", Arial(30), Magenta);
}
MyAppWindow() {
Title("My application").Zoomable().Sizeable();
}
};
GUI_APP_MAIN
{
MyAppWindow app;
app.SetRect(0, 0, 400, 100);
app.Run();
}
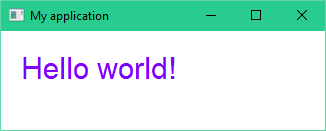
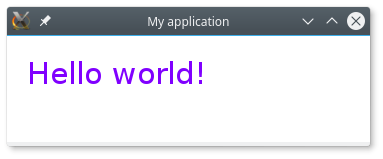
The same application running in different operating systems. On the top MS Windows and on the bottom GNU/Linux with KDE.
5. Reacting to input events
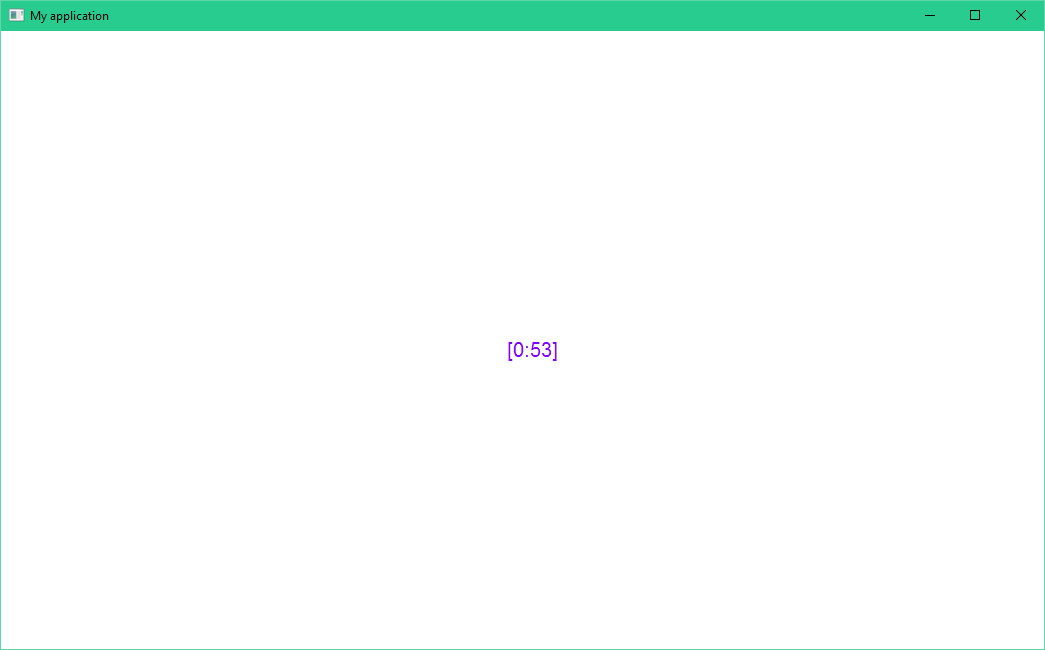
In order to react to user actions like mouse clicks or keyboard events, you have to override appropriate virtual methods for example LeftDown, MouseMove and Key. To issue the repainting of view area, use the Refresh method.
The following example demonstrates how to handle mouse events:
#include <CtrlLib/CtrlLib.h>
using namespace Upp;
struct MyAppWindow : TopWindow {
Point p;
String text;
void LeftDown(Point pos, dword flags) override {
p = pos;
Refresh();
}
void MouseMove(Point pos, dword flags) override {
text = Format("[%d:%d]", pos.x, pos.y);
Refresh();
}
void Paint(Draw& w) override {
w.DrawRect(GetSize(), SWhite);
w.DrawText(p.x, p.y, text, Arial(20), Magenta);
}
MyAppWindow() {
Title("My application").Zoomable().Sizeable();
p.x = p.y = 0;
}
};
GUI_APP_MAIN
{
MyAppWindow().Run();
}
The following example demonstrates how to handle keyboard events:
#include <CtrlLib/CtrlLib.h>
using namespace Upp;
struct MyAppWindow : TopWindow {
String text = "Press any arrow key...";
bool Key(dword key, int count) override {
switch(key) {
case K_UP:
text = "Up ⬆";
Refresh();
return true;
case K_DOWN:
text = "Down ⬇";
Refresh();
return true;
case K_LEFT:
text = "Left ⬅";
Refresh();
return true;
case K_RIGHT:
text = "Right ⮕";
Refresh();
return true;
default:
return TopWindow::Key(key, count);
}
}
void Paint(Draw& w) override {
w.DrawRect(GetSize(), SWhite);
w.DrawText(45, 20, text, Arial(20), Magenta);
}
MyAppWindow() {
Title("My application").Zoomable();
SetRect(0, 0, 400, 100);
}
};
GUI_APP_MAIN
{
MyAppWindow().Run();
}
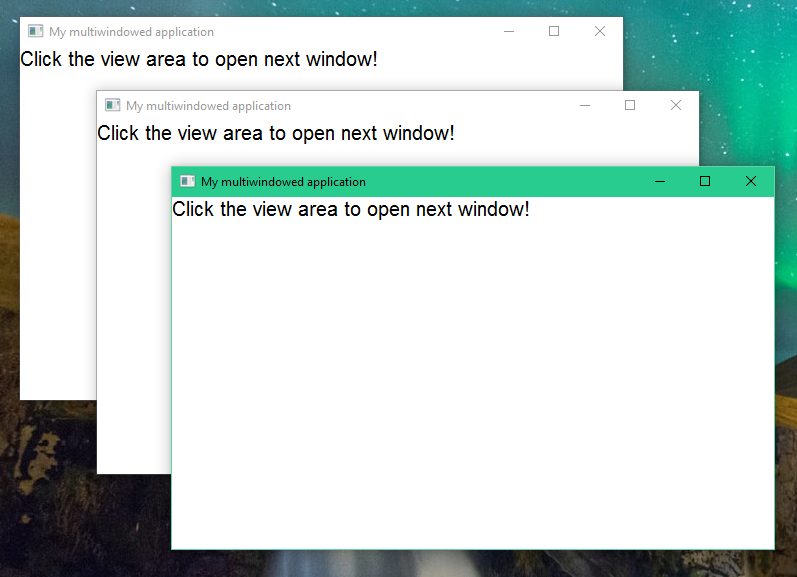
6. Multiple main windows
If you application uses multiple top-level peer windows, you cannot use the Run method as it runs the modal loop for just single window. Instead, you have to allocate top-level windows on the heap and use Ctrl::EventLoop - this event loop runs as long as there are any top-level windows opened. Use "delete this" in overridden Close method to close and deallocate the main window.
#include <CtrlLib/CtrlLib.h>
using namespace Upp;
struct MyAppWindow : TopWindow {
void Close() override {
delete this;
}
void LeftDown(Point pos, dword flags) override {
(new MyAppWindow)->OpenMain();
}
void Paint(Draw& w) override {
w.DrawRect(GetSize(), SWhite());
w.DrawText(0, 0, "Click the view area to open next window!", Arial(20));
}
MyAppWindow() {
Title("My multiwindowed application").Zoomable().Sizeable();
}
};
GUI_APP_MAIN
{
(new MyAppWindow)->OpenMain();
Ctrl::EventLoop();
}
Note: this is one of rare cases where it makes sense in U++ to call new and delete directly.
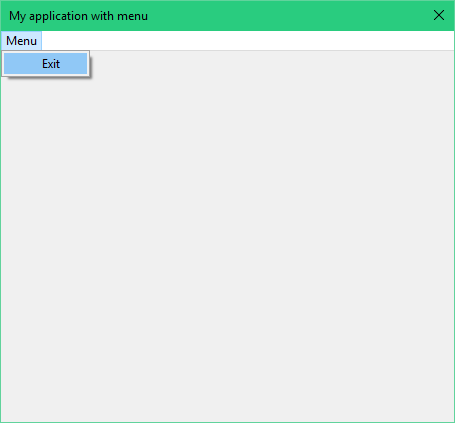
7. Menu
Content of menu in U++ is represented by the function or method adding required menu items to the Bar. Items can contain Events to actions invoked by choosing the menu item or Events to represent sub-menus. Menu itself is managed by MenuBar. MenuBar can act both as widget or as a Frame. Frames are placed to the window border and reduce its view area.
#include <CtrlLib/CtrlLib.h>
using namespace Upp;
struct MyAppWindow : TopWindow {
MenuBar menu;
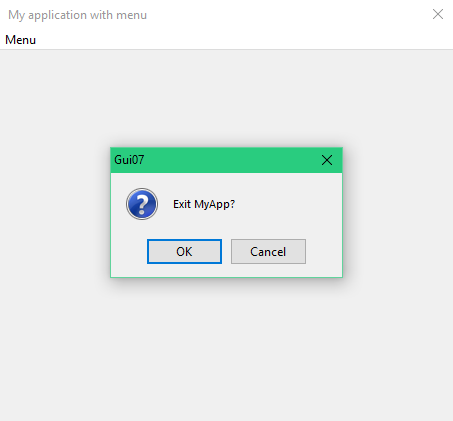
void Exit() {
if(PromptOKCancel("Exit MyApp?"))
Break();
}
void SubMenu(Bar& bar) {
bar.Add("Exit", [=] { Exit(); });
}
void MainMenu(Bar& bar) {
bar.Sub("Menu", [=](Bar& bar) { SubMenu(bar); });
}
MyAppWindow() {
Title("My application with menu").Sizeable();
AddFrame(menu);
menu.Set([=](Bar& bar) { MainMenu(bar); });
}
};
GUI_APP_MAIN
{
MyAppWindow app;
app.Run();
}
Of course, with power of C++11 lambdas, it is also possible, if not always advisable, to 'inline' the whole menu structure to single MenuBar::Set call:
#include <CtrlLib/CtrlLib.h>
using namespace Upp;
struct MyAppWindow : TopWindow {
MenuBar menu;
MyAppWindow() {
Title("My application with menu").Sizeable();
AddFrame(menu);
menu.Set([=](Bar& bar) {
bar.Sub("Menu", [=](Bar& bar) {
bar.Add("Exit", [=] {
if(PromptOKCancel("Exit MyApp?"))
Break();
});
});
});
}
};
GUI_APP_MAIN
{
MyAppWindow app;
app.Run();
}
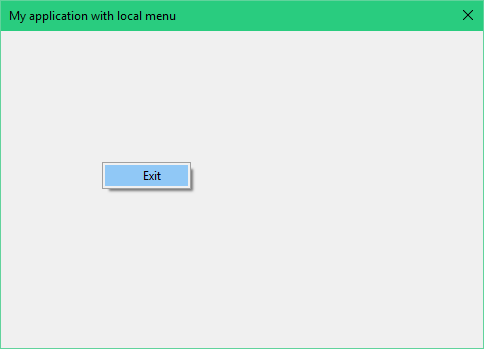
8. Context menu
Context local menu (usually invoked by right mouse click) is similar to the standard menu bar handling, just instead of adding MenuBar to your application, you execute the menu event:
#include <CtrlLib/CtrlLib.h>
using namespace Upp;
struct MyAppWindow : TopWindow {
void Exit() {
if(PromptOKCancel("Exit MyApp?"))
Break();
}
void RightDown(Point, dword) override {
MenuBar::Execute(
[=](Bar& bar) {
bar.Add("Exit", [=] { Exit(); });
}
);
}
MyAppWindow() {
Title("My application with local menu").Sizeable();
}
};
GUI_APP_MAIN
{
MyAppWindow app;
app.Run();
}
9. Context menu alternative
It is also possible to create context menu by adding menu items directly to MenuBar. Example also demonstrates how to convert the menu item to some value, by using lambda capture by reference:
#include <CtrlLib/CtrlLib.h>
using namespace Upp;
struct MyAppWindow : TopWindow {
void Exit() {
if(PromptOKCancel("Exit MyApp?"))
Break();
}
void RightDown(Point, dword) override {
int result = Null;
MenuBar menu;
for(int i = 0; i < 10; i++)
menu.Add(AsString(i), [=, &result] { result = i; });
menu.Separator();
menu.Add("Exit", [=] { Exit(); });
menu.Execute();
if(!IsNull(result))
PromptOK("You have selected " + AsString((int)result));
}
MyAppWindow() {
Title("My application with context menu").Sizeable();
}
};
GUI_APP_MAIN
{
MyAppWindow app;
app.Run();
}
10. Adding images
To add some eye-candy to the menu, you can add small raster images. In U++, images are represented by Image values. You can use image designer, part of TheIDE, to design Image constants
To get the image constants into your application you have to use somewhat obfuscated but thankfully short sequence of preprocessor commands:
#include <CtrlLib/CtrlLib.h>
using namespace Upp;
#define IMAGECLASS TutorialImg
#define IMAGEFILE <Gui10/images.iml>
#include <Draw/iml.h>
struct MyAppWindow : TopWindow {
MenuBar menu;
void Exit() {
if(PromptOKCancel("Exit MyApp?"))
Break();
}
void SubMenu(Bar& bar) {
bar.Add("Exit", TutorialImg::Exit(), [=] { Exit(); });
}
MyAppWindow() {
Title("My application with menu and images").Sizeable();
AddFrame(menu);
menu.Set([=](Bar& bar) {
bar.Sub("Menu", [=](Bar& bar) { SubMenu(bar); });
});
}
};
GUI_APP_MAIN
{
MyAppWindow app;
app.Run();
}
Here Gui10 is the name of package where .iml file resides.
Image constants are represented by class methods of class defined as IMAGECLASS (TutorialImg in this case). Image constant then can be added to menu as another parameter of Bar::Add.
#include <Draw/iml.h> works only when images are to be used in single .cpp file, otherwise you must put "obfuscated" sequence with #include <Draw/iml_header.h> to you header and #include <Draw/iml_source.h> to any .cpp file inside your package.
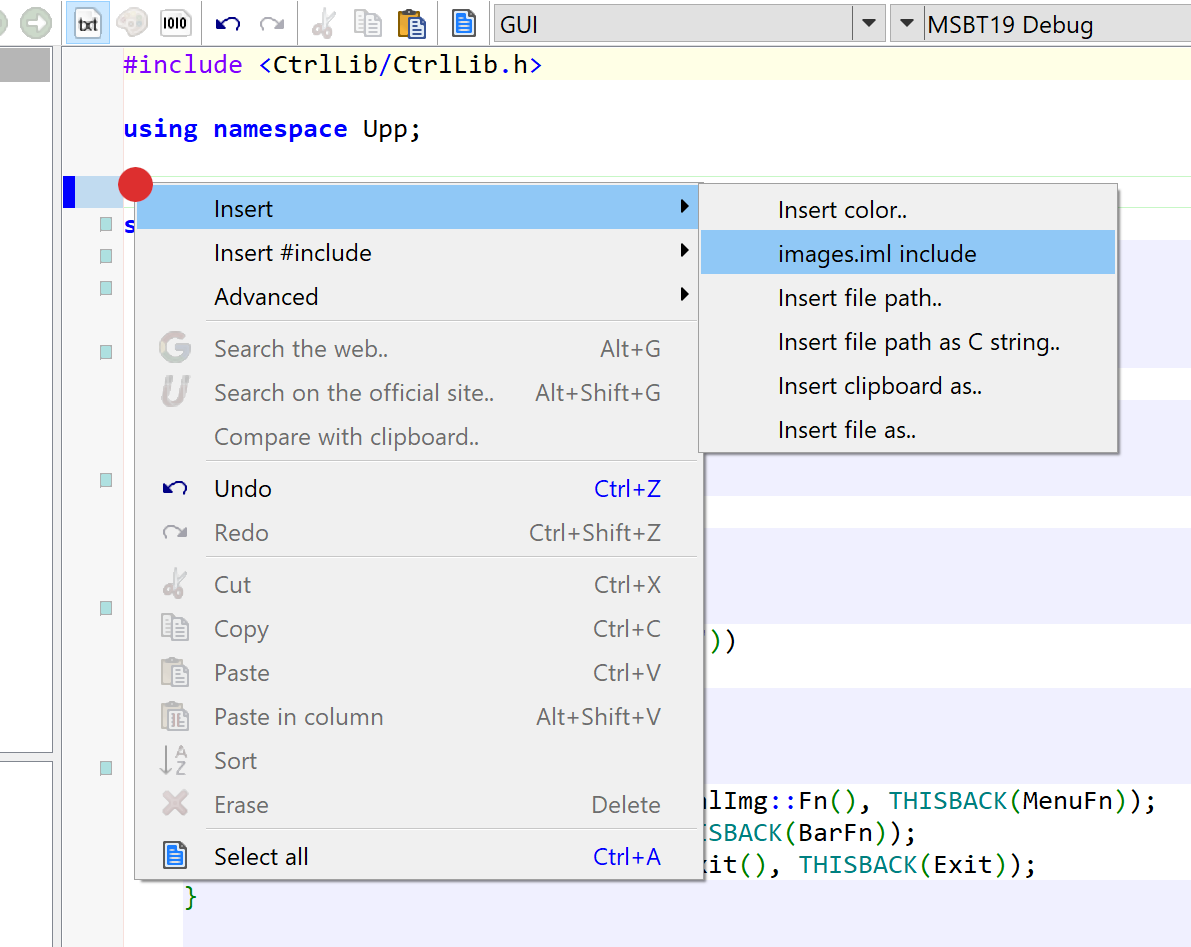
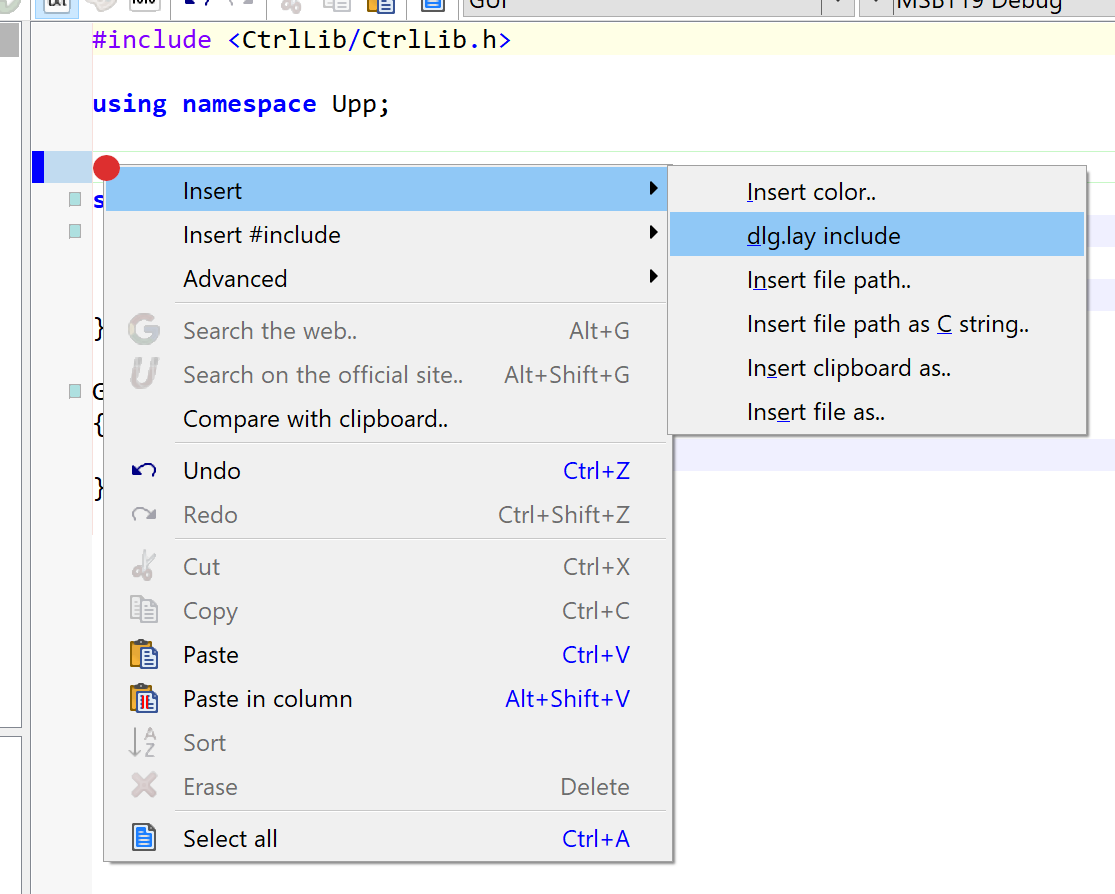
Note that to avoid typing, you can insert the code to include images using TheIDE's code editor context menu:
The above insertion creates both header and source code.
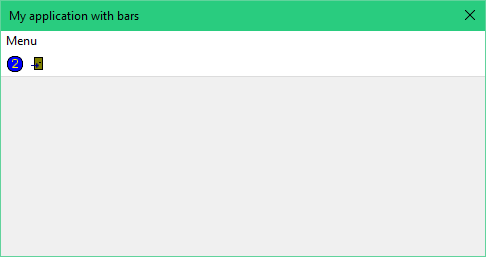
11. Toolbar
Toolbars are in fact quite similar to menus - they provide set of operations with names and Images that can be invoked by user. In U++ you can take advantage of this similarity as toolbars can share the definition with menus - if Bar::Add command contains the Image, it also adds toolbar button with that Image when used with ToolBar. The text of menu item then translates to button tip. If you want one particular Bar item to be used with menu or toolbar only, you can do that by using AddMenu or AddTool instead of simple Add. Also, items without Image are automatically added to menus only and vice versa, items without text are added to toolbars only.
#include <CtrlLib/CtrlLib.h>
using namespace Upp;
#define IMAGECLASS TutorialImg
#define IMAGEFILE <Gui11/images.iml>
#include <Draw/iml.h>
struct MyAppWindow : TopWindow {
MenuBar menu;
ToolBar tool;
void MenuFn() {
PromptOK("Fn activated!");
}
void BarFn() {
PromptOK("Fn2 activated!");
}
void Exit() {
if(PromptOKCancel("Exit MyApp?"))
Break();
}
void SubBar(Bar& bar) {
bar.AddMenu("Function", TutorialImg::Fn(), [=] { MenuFn(); });
bar.Add(TutorialImg::Fn2(), [=] { BarFn(); });
bar.Add("Exit", TutorialImg::Exit(), [=] { Exit(); });
}
void MainMenu(Bar& bar) {
bar.Sub("Menu", [=](Bar& bar) { SubBar(bar); });
}
MyAppWindow() {
Title("My application with bars").Sizeable();
AddFrame(menu);
AddFrame(tool);
menu.Set([=](Bar& bar) { MainMenu(bar); });
tool.Set([=](Bar& bar) { SubBar(bar); });
}
};
GUI_APP_MAIN
{
MyAppWindow app;
app.Run();
}
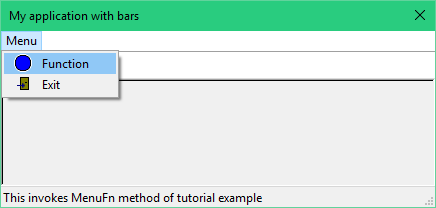
12. StatusBar and decorative Frames
To improve the visual aspect of the application, we can add some decorative Frames - those are frames that do not represent any action, just draw some kind of border at given frame level. We will also add the StatusBar and connect it to the menu and toolbar - this way it will start displaying descriptions placed to Bar items using a Help method. Note that decorative frame functions (TopSeparatorFrame and InsetFrame here) usually return a reference to single global object, as there are no changing properties required when using them with different windows and widgets concurrently. Finally, this example also demonstrates the use of THISFN macro, which is an shortcut alternative for some lambdas - in this case THISFN(SubBar) is equivalent to [=](Bar& bar) { SubBar(bar); }.
#include <CtrlLib/CtrlLib.h>
using namespace Upp;
#define IMAGECLASS TutorialImg
#define IMAGEFILE <Gui12/images.iml>
#include <Draw/iml.h>
struct MyAppWindow : TopWindow {
MenuBar menu;
ToolBar tool;
StatusBar status;
typedef MyAppWindow CLASSNAME; // so that we can use THISFN shortcut
void SubBar(Bar& bar) {
bar.AddMenu("Function", TutorialImg::Fn(), [=] { // AddMenu - only in menu
PromptOK("Fn activated!");
}).Help("This invokes MenuFn method of tutorial example");
bar.Add(TutorialImg::Fn2(), [=] { // does not have image - not in toolbar
PromptOK("Fn2 activated!");
}).Help("This invokes BarFn method of tutorial example");
bar.Add("Exit", TutorialImg::Exit(), [=] { // in both toolbar and menu
if(PromptOKCancel("Exit MyApp?"))
Break();
});
}
void MainMenu(Bar& bar) {
bar.Sub("Menu", THISFN(SubBar));
}
MyAppWindow() {
Title("My application with bars").Sizeable();
AddFrame(menu);
AddFrame(TopSeparatorFrame());
AddFrame(tool);
AddFrame(status);
AddFrame(InsetFrame());
menu.Set(THISFN(MainMenu));
menu.WhenHelp = status;
tool.Set([=](Bar& bar) { SubBar(bar); }); // equivalent to THISFN(SubBar)
tool.WhenHelp = status;
}
};
GUI_APP_MAIN
{
MyAppWindow app;
app.Run();
}
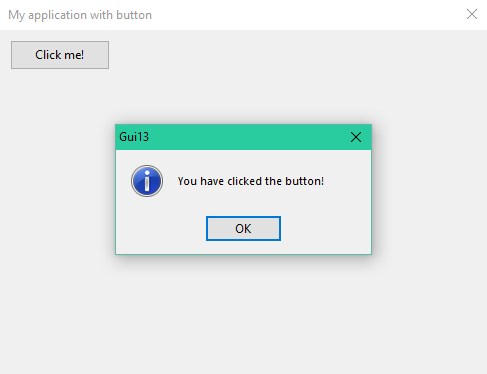
13. Adding child Ctrls - widgets, reacting to widget events
If you need to use some predefined child Ctrl (widget), place as variable somewhere, usually as member variable of your window or dialog class and use Add (or operator <<) to put it to your window.
#include <CtrlLib/CtrlLib.h>
using namespace Upp;
struct MyAppWindow : TopWindow {
Button button;
MyAppWindow() {
Title("My application with button");
Add(button.LeftPos(10, 200).TopPos(10, 60));
button.SetLabel("Click me!");
button << [=] {
PromptOK("You have clicked the button!");
};
}
};
GUI_APP_MAIN
{
MyAppWindow app;
app.Run();
}
Position within parent view is given in logical coordinates (e.g. LeftPos or TopPos) that allow no-nonsense resizing of dialog. Widget events (like "button pushed") are reflected by its callbacks. There exists a "default" WhenAction Event in each widget that is invoked when user changes a value or a state of widget. You can access it either directly
widget.WhenAction ....
or use operator<< version that adds and action to this widget
widget << ....
Note also that to make the code more clear and less verbose, U++ uses "method chaining" technique, where methods (usually those that affect appearance, position or behavior of widgets - "modifiers" in U++ lingo) are designed to return a reference to *this - that should explain the line
Add(button.LeftPos(10, 100).TopPos(10, 30));
14 More about logical coordinates
14.1 Explanations
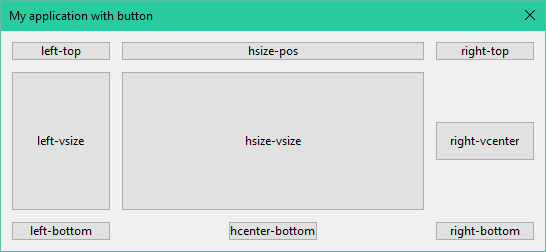
Logical coordinates can align one or both sides of widget to the side of parent view at specified distance(s) in both vertical and horizontal direction. If only one side is aligned, logical coordinate specifies the size. There is also specific kind of logical coordinate the specifies the center position.
#include <CtrlLib/CtrlLib.h>
using namespace Upp;
struct MyAppWindow : TopWindow {
Button lt, rt, lb, rb, lv, ht, hv, cb, rc;
MyAppWindow() {
Title("My application with button").Sizeable();
*this
<< lt.SetLabel("left-top").LeftPos(10, 200).TopPos(10, 40)
<< rt.SetLabel("right-top").RightPos(10, 200).TopPos(10, 40)
<< lb.SetLabel("left-bottom").LeftPos(10, 200).BottomPos(10, 40)
<< rb.SetLabel("right-bottom").RightPos(10, 200).BottomPos(10, 40)
<< lv.SetLabel("left-vsize").LeftPos(10, 200).VSizePos(60, 60)
<< ht.SetLabel("hsize-pos").HSizePos(220, 220).TopPos(10, 40)
<< hv.SetLabel("hsize-vsize").HSizePos(220, 220).VSizePos(60, 60)
<< cb.SetLabel("hcenter-bottom").HCenterPos(200).BottomPos(10, 40)
<< rc.SetLabel("right-vcenter").RightPos(10, 200).VCenterPos(40)
;
}
};
GUI_APP_MAIN
{
MyAppWindow app;
app.Run();
}
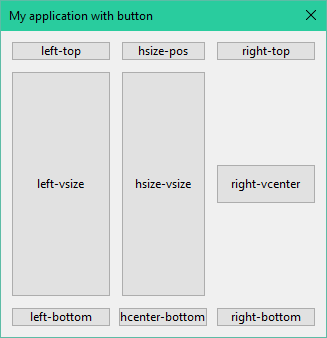
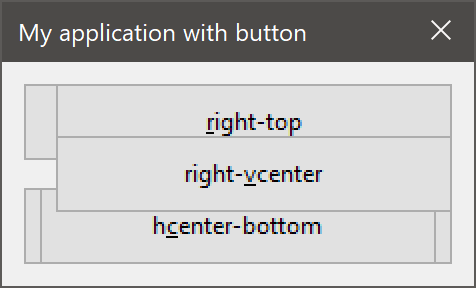
14.2 Minimal window size
When you decrease the size of dialog too much, buttons in this example start to overlap
which is something that is in most cases undesirable. To fix the problem, you can specify the minimal size of window:
#include <CtrlLib/CtrlLib.h>
using namespace Upp;
struct MyAppWindow : TopWindow {
Button lt, rt, lb, rb, lv, ht, hv, cb, rc;
MyAppWindow() {
Title("My application with button").Sizeable().SetMinSize(Zsz(600, 400));
*this
<< lt.SetLabel("left-top").LeftPos(10, 200).TopPos(10, 40)
<< rt.SetLabel("right-top").RightPos(10, 200).TopPos(10, 40)
<< lb.SetLabel("left-bottom").LeftPos(10, 200).BottomPos(10, 40)
<< rb.SetLabel("right-bottom").RightPos(10, 200).BottomPos(10, 40)
<< lv.SetLabel("left-vsize").LeftPos(10, 200).VSizePos(60, 60)
<< ht.SetLabel("hsize-pos").HSizePos(220, 220).TopPos(10, 40)
<< hv.SetLabel("hsize-vsize").HSizePos(220, 220).VSizePos(60, 60)
<< cb.SetLabel("hcenter-bottom").HCenterPos(200).BottomPos(10, 40)
<< rc.SetLabel("right-vcenter").RightPos(10, 200).VCenterPos(40)
;
}
};
GUI_APP_MAIN
{
MyAppWindow app;
app.Run();
}
Zsz function converts arguments using font zooming to account for various base GUI font settings.
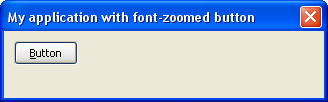
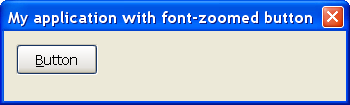
15. Font-zooming
All distances in U++ widgets are always in pixels. However, to respond to platform setting of GUI font, U++ provides functions to zoom coordinates accordingly. Such zooming scale distances by the ratio of current standard GUI font size to design font size (which is based on old Win95 standard font size). Functions Zx and Zy scale the horizontal or vertical distance. Logical coordinate methods that end with Z (like LeftPosZ or TopPosZ) are then scaling the values with these functions.
#include <CtrlLib/CtrlLib.h>
using namespace Upp;
struct MyAppWindow : TopWindow {
Button button;
MyAppWindow() {
Title("My application with font-zoomed button").Sizeable();
*this << button.SetLabel("Button").LeftPos(Zx(10), Zy(64)).TopPosZ(10, 24);
}
};
GUI_APP_MAIN
{
MyAppWindow app;
app.Run();
}
16. Layouts
16.1 Referral implementation
Placing widgets by specifying their numeric logical coordinates would be time-consuming, therefore TheIDE provides a visual designer to simplify this task.
Visual design in U++ is called Layout Designer. Its extensive documentation is available here.
A group of layouts is stored in .lay file. Format of .lay files is such that it can be directly included into C++:
#include <CtrlLib/CtrlLib.h>
using namespace Upp;
#define LAYOUTFILE <Gui16a/dlg.lay>
#include <CtrlCore/lay.h>
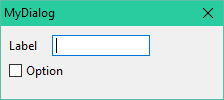
struct MyAppWindow : public WithDlgLayout<TopWindow> {
MyAppWindow() {
CtrlLayout(*this, "MyDialog");
}
};
GUI_APP_MAIN
{
MyAppWindow().Run();
}
Deriving from WithDlgLayout<TopWindow> adds layout widgets as member variables. The CtrlLayout() function call then setups attributes of all layout widgets, including its logical coordinates.
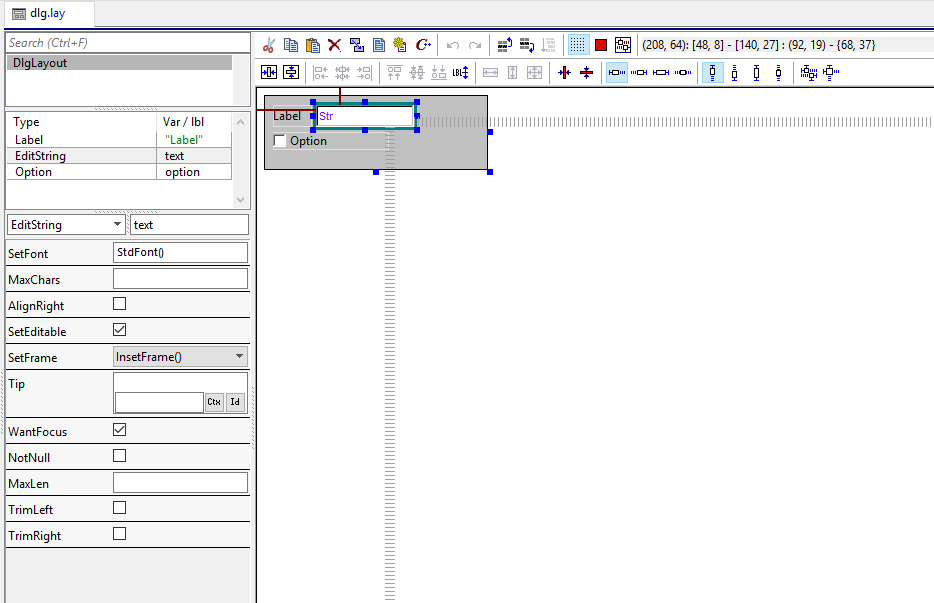
To understand how layout mechanism works, let's examine the content of .lay file:
LAYOUT(DlgLayout, 208, 64)
ITEM(Upp::Label, dv___0, SetLabel(t_("Label")).LeftPosZ(8, 36).TopPosZ(8, 19))
ITEM(Upp::EditString, text, LeftPosZ(48, 92).TopPosZ(8, 19))
ITEM(Upp::Option, option, SetLabel(t_("Option")).LeftPosZ(8, 108).TopPosZ(32, 15))
END_LAYOUT
Header CtrlCore/lay.h includes LAYOUTFILE several times, altering definition of LAYOUT, ITEM and END_LAYOUT to produce C++ code which simplified form for this example looks like
template <class Base>
struct WithDlgLayout : Base {
Label dv___0;
EditString text;
Option option;
};
template <class T>
CtrlLayout(T& dlg, const char *title)
{
Size sz = Ctrl::LayoutZoom(208, 64)
dlg.SetMinSize(sz);
dlg.SetRect(sz);
dlg.Title(title);
dlg.dv___0.SetLabel(t_("Label")).LeftPosZ(8, 36).TopPosZ(8, 19);
dlg.text.LeftPosZ(48, 92).TopPosZ(8, 19);
dlg.option.SetLabel(t_("Option")).LeftPosZ(8, 108).TopPosZ(32, 15);
}
This way, U++ keeps tight coupling between visual design and C++ code.
Just like with .iml files, there is TheIDE code editor context menu function that creates necessary code to import .lay file for you:
Note: t_ function with string literal argument provides internationalization of texts. dv___0 is synthetic member variable name used for unnamed layout members (0 is index of member).
16.2 Upp namespace agnostic implementation
If you prefer to write code that is namespace agnostic, you are not forced to use "using namespace Upp" in the context of using layouts. Below implementation presents how you could avoid such situation:
#include <CtrlLib/CtrlLib.h>
#define LAYOUTFILE <Gui16b/dlg.lay>
#include <CtrlCore/lay.h>
struct MyAppWindow : public WithDlgLayout<Upp::TopWindow> {
MyAppWindow() {
CtrlLayout(*this, "MyDialog");
}
};
GUI_APP_MAIN
{
MyAppWindow().Run();
}
17. Value of widget
Many widgets have some sort of natural value. E.g. the value of EditString is String entered by user, whereas the value of Option is bool specifying the status of the option.
U++ provides unified interface to determine the main value of widget via GetData and SetData methods. All types of values are passed using polymorphic Value.
#include <CtrlLib/CtrlLib.h>
using namespace Upp;
GUI_APP_MAIN
{
TopWindow app;
app.SetRect(0, 0, Zx(200), Zy(20));
EditString text;
app.Add(text.TopPosZ(0, 20).HSizePos());
text.SetData("Some text");
app.Run();
PromptOK((String)text.GetData());
}
Because this feature is used very frequently, U++ provides operator overloads for this interface - operator<<= for SetData and operator~ for GetData.
#include <CtrlLib/CtrlLib.h>
using namespace Upp;
GUI_APP_MAIN
{
TopWindow app;
app.SetRect(0, 0, Zx(200), Zy(20));
EditString text;
app.Add(text.TopPosZ(0, 20).HSizePos());
text <<= "Some text - operator version";
app.Run();
PromptOK((String)~text);
}
18. Accepting and rejecting widgets
Ctrl interface provides
virtual bool Accept();
virtual void Reject();
methods. Accepting is usually a reaction to pressing OK button or similar approve operation and usually involves testing for correct content and finishing any pending operations for widget (this may involve e.g. updating data to SQL database). Accept must return true if widget is accepted.
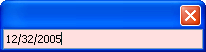
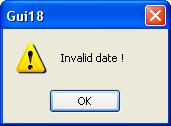
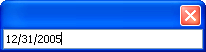
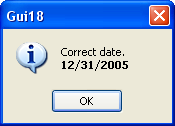
Default Ctrl implementation calls GetData for the widget. If ErrorValue (special Value content) is returned by GetData, displays error information contained and returns false, otherwise recursively calls Accept for all children, anding the loop and returning false when any child returns one. If no false was returned so far, Accept returns true.
The opposite action to Accept is Reject. This is used when Cancel button is pressed or similar rejecting action. It simply cancels all pending operations on widget. Default implementation calls Reject for all children.
#include <CtrlLib/CtrlLib.h>
using namespace Upp;
GUI_APP_MAIN
{
TopWindow app;
app.SetRect(0, 0, Zx(200), Zy(20));
EditDate date;
app.Add(date.TopPosZ(0, 20).HSizePos());
app.Run();
if(app.Accept())
PromptOK("Correct date.&[* " + AsString(~date));
}
 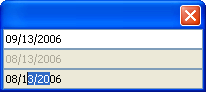
19. Widget edit status flags
Ctrl interface provides several edit status flags:
Enabled/Disabled - disabled widgets do not receive any input. Disabled status is usually expressed by altered visual appearance of widget.
Editable/ReadOnly - read only widgets receive input messages but no changes to data are allowed. The difference from disabled status is that ReadOnly status allows read operations, like selecting and copying data to clipboard.
Modified - modify flag is set to true whenever data in widget change - either by user action or by widget's interface. Flag is cleared by ClearModify method.
Note that with exception of suppressing input events for disabled state, implementation of widgets is responsible for correct behaviour with respect to listed flags.
#include <CtrlLib/CtrlLib.h>
using namespace Upp;
GUI_APP_MAIN
{
TopWindow app;
app.SetRect(0, 0, Zx(200), Zy(60));
EditDate date1, date2, date3;
date1 <<= date2 <<= date3 <<= GetSysDate();
date1.ClearModify();
app.Add(date1.TopPosZ(0, 20).HSizePos());
date2.Disable();
app.Add(date2.TopPosZ(20, 20).HSizePos());
date3.SetReadOnly();
app.Add(date3.TopPosZ(40, 20).HSizePos());
app.Run();
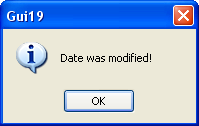
if(date1.IsModified())
PromptOK("Date was modified!");
}
20. Breaking the modal loop
When you invoke Run for your TopWindow, the new event loop starts. In order to exit it, e.g. by pressing the button, you have to call TopWindow's Break method. Argument passed to Break is then returned from Run.
#include <CtrlLib/CtrlLib.h>
using namespace Upp;
struct MyAppWindow : TopWindow {
Button exit;
MyAppWindow() {
SetRect(0, 0, Zx(100), Zy(100));
Add(exit.SetLabel("exit").LeftPosZ(10, 64).TopPosZ(10, 24));
exit << [=] { Break(999); };
}
};
GUI_APP_MAIN
{
MyAppWindow().Run();
}
As this is very common situation, TopWindow provides another method, Breaker, which returns an Event which, when invoked, performs the Break.
#include <CtrlLib/CtrlLib.h>
using namespace Upp;
struct MyAppWindow : TopWindow {
Button exit;
MyAppWindow() {
SetRect(0, 0, Zx(100), Zy(100));
Add(exit.SetLabel("exit").LeftPosZ(10, 64).TopPosZ(10, 24));
exit << Breaker(999);
}
};
GUI_APP_MAIN
{
MyAppWindow().Run();
}
Another common situation is handling OK and Cancel buttons. OK button has to Accept the dialog before breaking the loop (if accept is successful), Cancel has to Reject it. TopWindow therefore provides Acceptor and Rejector methods providing Callbacks that invoke Accept and Reject as needed before calling the Break.
#include <CtrlLib/CtrlLib.h>
using namespace Upp;
struct MyAppWindow : TopWindow {
Button ok, cancel;
EditDate date;
MyAppWindow() {
SetRect(0, 0, Zx(200), Zy(90));
Add(date.LeftPosZ(10, 80).TopPosZ(10, 20));
Add(ok.SetLabel("OK").LeftPosZ(10, 64).TopPosZ(40, 24));
Add(cancel.SetLabel("Cancel").LeftPosZ(100, 64).TopPosZ(40, 24));
ok.Ok() << Acceptor(IDOK);
cancel.Cancel() << Rejector(IDCANCEL);
}
};
GUI_APP_MAIN
{
MyAppWindow app;
switch(app.Run()) {
case IDOK:
PromptOK(String().Cat() << "OK: " << ~app.date);
break;
case IDCANCEL:
Exclamation("Canceled");
}
}
Calls to Ok and Cancel methods of Button here make Button react to Enter and Esc keys and add specific visual appearance.
To reduce tedious tasks even further, there are CtrlLayoutOK, CtrlLayoutCancel, CtrlLayoutOKCancel etc. template functions that both setup layout and assign Acceptors and Rejectors!
main.cpp:
#include <CtrlLib/CtrlLib.h>
using namespace Upp;
#define LAYOUTFILE <Gui20d/myapp.lay>
#include <CtrlCore/lay.h>
GUI_APP_MAIN
{
WithMyAppLayout<TopWindow> app;
CtrlLayoutOKCancel(app, "MyApp");
switch(app.Run()) {
case IDOK:
PromptOK(String().Cat() << "OK: " << ~app.date);
break;
case IDCANCEL:
Exclamation("Canceled");
}
}
myapp.lay:
LAYOUT(MyAppLayout, 148, 64)
ITEM(Upp::EditDate, date, LeftPosZ(4, 88).TopPosZ(4, 19))
ITEM(Upp::Button, ok, SetLabel(t_("OK")).LeftPosZ(4, 64).TopPosZ(32, 24))
ITEM(Upp::Button, cancel, SetLabel(t_("Cancel")).LeftPosZ(76, 64).TopPosZ(32, 24))
END_LAYOUT
Please note that the layout has to contain corresponding correctly named widgets (Button ok, cancel) in order to make this work.
Note: IDOK, IDCANCEL are predefined constants.
21. Creating and using custom widgets
There is really nothing special about creating your own widgets. All that is to be done is to derive your own class from Ctrl (or some other existing widget, if that fits better) and override Ctrl's virtual methods to paint the widgets and do something useful:
struct MyCtrl : public Ctrl {
int count = 0;
void Paint(Draw& w) override {
w.DrawRect(GetSize(), White());
w.DrawText(2, 2, AsString(count));
}
void LeftDown(Point, dword) override {
count++;
Refresh();
}
};
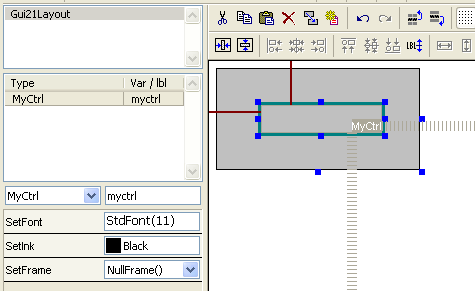
To put your widget into your layout based dialog, the simple way is to add it as "User class". In that case you just fill in the name of class and layout designer shows the custom widget as empty rectangle with class name displayed on it:
Note that layout file has to be included after declaration of custom widget (so that the class is defined at that point).
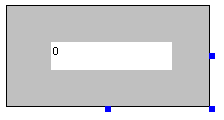
While empty rectangle in layout designer is usually enough for seldom used widgets, you can also teach TheIDE to show something better using .usc script file:
ctrl MyCtrl {
group "Example";
GetMinSize() { sz = GetTextSize("X"); sz.cy += 2; return sz; }
GetStdSize() { sz = GetMinSize(); sz.cx *= 7; return sz; }
Paint(w) {
r = GetRect();
w.DrawRect(r, :White);
w.DrawText(2, 2, "0", StdFont(), :Black);
}
};
Note: This is not the C++, but a piece of script in "Esc" scripting language, interpreted by layout designer.
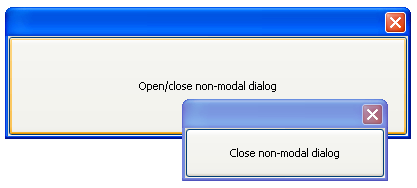
22. Non-modal dialogs
To have non-modal dialog, just Open it passing its owner window as parameter. Usually the best arrangement is to have non-modal dialog as member variable of its owner window. Non-modal dialog is dismissed using the Close method just like any other window.
#include <CtrlLib/CtrlLib.h>
using namespace Upp;
struct NonModalDialog : public TopWindow {
Button b;
NonModalDialog() {
SetRect(0, 0, Zx(200), Zy(50));
Add(b.SetLabel("Close non-modal dialog").SizePos());
b << [=] { Close(); };
}
};
struct MainWindow : public TopWindow {
NonModalDialog dlg;
Button b;
MainWindow() {
SetRect(0, 0, Zx(400), Zy(100));
Add(b.SetLabel("Open/close non-modal dialog").SizePos());
b << [=] {
if(dlg.IsOpen())
dlg.Close();
else
dlg.Open(this);
};
}
};
GUI_APP_MAIN
{
MainWindow win;
win.Run();
}
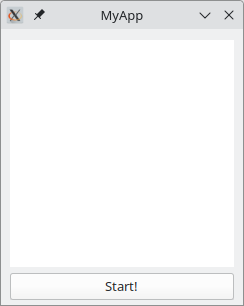
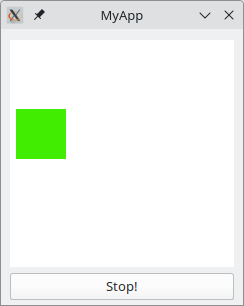
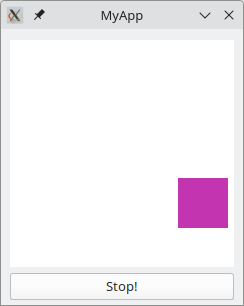
23. Refreshing the UI periodically (time callback)
Sometimes there is a need to refresh the UI periodically. For example, in a situation where you have a state that is changing over time, A good example of such a state might be a timer or a clock. The clock hands change every second. To refresh the UI at intervals, there is a dedicated Ctrl method called SetTimeCallback. It's first argument is a period in milliseconds. The second one is a callback to the function that will be executed after that time. Please keep in mind that the first parameter might be positive. Then the time callback will be executed only once, or if it is negative, it will be executed indefinitely. However, the time loop in this case can be broken by calling KillTimeCallback method.
// The OnTimer() function will be executed only once after one second.
SetTimeCallback(1000, [=] { OnTimer(); });
// The OnTimer() function will be executed on every second indefinitely.
SetTimeCallback(-1000, [=] { OnTimer(); });
// To destroy an indefinite time callback, call...
KillTimeCallback();
In the exemplary code in this tutorial, we will build a simple window with start and stop button that will activate or deactivate rectangle painting in a random place. Also, after that time, the color of the rectangle will be changed to random. This will be achieved with the previously described methods.
main.cpp
#include <CtrlLib/CtrlLib.h>
using namespace Upp;
struct RandomRectCtrl : public Ctrl {
Rect rect = Rect(Size(0, 0));
Color color;
void Paint(Draw& w) override {
Size sz = GetSize();
w.DrawRect(sz, White());
if (!rect.IsEmpty()) {
w.DrawRect(rect, color);
}
}
void RandomizeRect() {
Size sz = GetSize();
int length = 50;
int x = Random() % (sz.cx - length);
int y = Random() % (sz.cy - length);
rect = Rect(x, y, x + length, y + length);
color = Color(Random() % 256, Random() % 256, Random() % 256);
}
};
#define LAYOUTFILE <Gui23/myapp.lay>
#include <CtrlCore/lay.h>
struct MyAppWindow : public WithMyAppLayout<TopWindow> {
MyAppWindow() {
CtrlLayout(*this, "MyApp");
start_stop_btn << [=] { OnStartStop(); };
}
~MyAppWindow() {
// Not needed will be automatically call upon Ctrl destruction.
// KillTimeCallback();
}
void OnStartStop() {
if (random_rect_ctrl.rect.IsEmpty()) {
start_stop_btn.SetLabel("Stop!");
// When the user clicks the "Start" button, OnTimer() is immediately executed after
// all related events have been processed, to generate and display a random rectangle.
SetTimeCallback(0, [=] { OnTimer(); });
// Calls OnTimer() every two seconds to update the random position of a rectangle.
SetTimeCallback(-2000, [=] { OnTimer(); });
} else {
KillTimeCallback();
start_stop_btn.SetLabel("Start!");
random_rect_ctrl.rect.Clear();
random_rect_ctrl.Refresh();
}
}
void OnTimer() {
random_rect_ctrl.RandomizeRect();
random_rect_ctrl.Refresh();
}
};
GUI_APP_MAIN
{
MyAppWindow().Run();
}
myapp.lay
LAYOUT(MyAppLayout, 200, 200)
ITEM(Upp::Button, start_stop_btn, SetLabel(t_("Start!")).HSizePosZ(8, 8).BottomPosZ(4, 20))
ITEM(RandomRectCtrl, random_rect_ctrl, HSizePosZ(8, 8).VSizePosZ(8, 28))
END_LAYOUT
24. Internationalizing applications (i18n)
As the globalization progress, it becomes important to deliver application on various markets. Often people on these markets use different languages. In this section we will show how to create an application that will support multiple locales. For this purpose, we will pick up one of the previous example in which simple text is displayed inside the window, and we will add translation support to it:
main.cpp:
#include <CtrlLib/CtrlLib.h>
// The below include needs to be placed in one of implementation file (.cpp)
#define TFILE <Gui24/Gui24.t>
#include <Core/t.h>
using namespace Upp;
struct MyAppWindow : TopWindow {
MyAppWindow() {
Title(t_("My application"));
Zoomable().Sizeable().SetRect(0, 0, 550, 100);
}
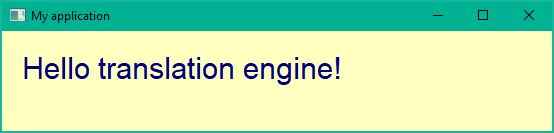
void Paint(Draw& w) override {
w.DrawRect(GetSize(), SLtYellow);
w.DrawText(20, 20, t_("Hello translation engine!"), Arial(30), SBlue);
}
};
GUI_APP_MAIN
{
// Set system language for whole application
SetLanguage(GetSystemLNG());
// Uncomment to force specific language...
// SetLanguage("en-us"); // English = default
// SetLanguage("cs-cz"); // Czech
// SetLanguage("de-de"); // German
// SetLanguage("es-es"); // Spanish
// SetLanguage("fr-fr"); // French
// SetLanguage("it-it"); // Italian
// SetLanguage("ja-jp"); // Japanese
// SetLanguage("pl-pl"); // Polish
// SetLanguage("pt-pt"); // Portuguese
// SetLanguage("ru-ru"); // Russian
// SetLanguage("tr-tr"); // Turkish
// SetLanguage("zh-cn"); // Simplified Chinese
// SetLanguage("zh-tw"); // Traditional Chinese
MyAppWindow().Run();
}
As you can see, all strings visible to the user are surrounded by t_ macro. This is the way to inform U++ translation engine that string is translatable. Right now we need to create translation file. After that, we need to synchronize translation. This operation will scan the whole source code and find all translatable strings. To make synchronization inside TheIDE we need to open "Project" menu and then select "Synchronized translation files...". The dialog should appear when you can specify for which packages translation synchronization should be run and which languages should be supported. In our case we will support main languages our users use.
The generated file with translated entries is located below. For the purpose of this section we used electronic translator, so for any errors we are sorry.
Gui23.t:
// Gui24.t
#ifdef _MSC_VER
#pragma setlocale("C")
#endif
// main.cpp
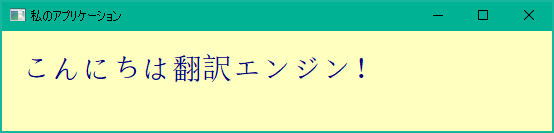
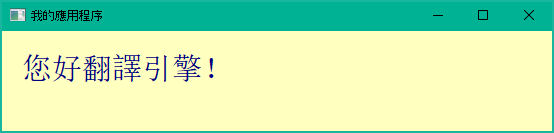
T_("My application")
csCZ("Moje aplikace")
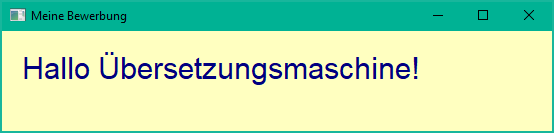
deDE("Meine Bewerbung")
esES("Mi aplicación")
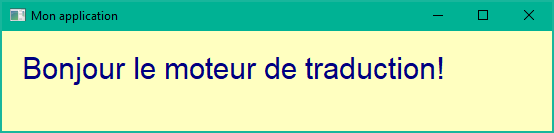
frFR("Mon application")
itIT("La mia applicazione")
jaJP("私のアプリケーション")
plPL("Moja aplikacja")
ptPT("Minha aplicação")
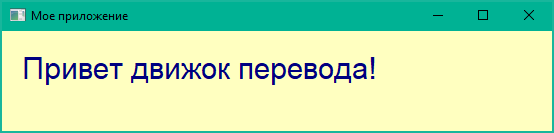
ruRU("Мое приложение")
trTR("Benim başvurum")
zhCN("我的应用程序")
zhTW("我的應用程式")
T_("Hello translation engine!")
csCZ("Ahoj překladači!")
deDE("Hallo Übersetzungsmaschine!")
esES("¡Hola motor de traducción!")
frFR("Bonjour le moteur de traduction!")
itIT("Ciao motore di traduzione!")
jaJP("こんにちは翻訳エンジン!")
plPL("Witaj silniku translacji!")
ptPT("Olá motor de tradução!")
ruRU("Привет движок перевода!")
trTR("Merhaba çeviri motoru!")
zhCN("您好翻译引擎!")
zhTW("您好翻譯引擎!")
Before checking the results of the application, let's take a closer look at framework construction used in this example. The first one is SetLanguage() function. It sets which language should be used by application. In our case we will use exactly the same language as users operating system is using. This information can be obtained by using GetSystemLNG() function and passed to SetLanguage().
The SetLanguage() function also sets the language on the library level. So, all controls that posses text visible to the user should be translated. In some cases it doesn't work due to lack of translation for a particular language. You could help in U++ translation by providing a dedicated patch. You could use exactly the same tools mentioned in this section. After that just generate patch and post it on appropriate forum.
Translation to work correctly in context of package requires the following lines of code to be placed in one of implementation file (.cpp):
#define TFILE <Gui23/Gui23.t>
#include <Core/t.h>
The final results from various exemplary languages versions are as follows:
For more information about translation please visit following documentation page.
Recommended tutorials:
If you want to learn more, we have several tutorials that you can find useful:
Core tutorial - learn basics of U++ programming.
Draw tutorial - in this tutorial we show more advance techniques of drawing inside window. This is the natural continue of things mention on this page.
Image tutorial - here we move things related to images. We show how to create, use and embed icons directly in application.
|