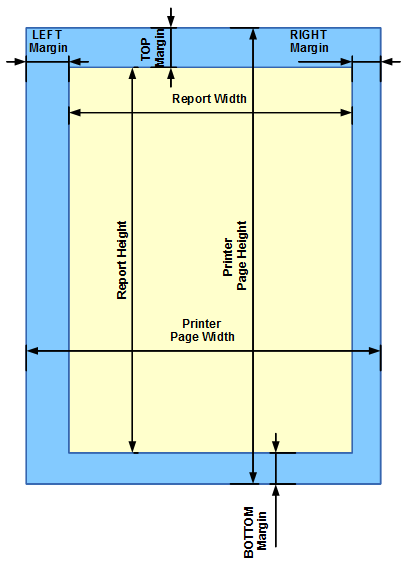
Report Print hints
Follow this to get correct print margins, print area and position on paper
Example : for A4 size paper
Printed Page Size : A4 ( 210x297 mm )
Left Margin : 25 mm
Right Margin : 10 mm
Top Margin : 10 mm
Bottom Margin : 10 mm
QTF Print Calculations are done @ 600DPI 1 mm = 600/25.4 = 6000 / 254 is 23.6 dots per mm
Values in Report setting are int. multiplication by 6000 then divide by 254 we get better precision
Report Setting :
These calculated margins can be used for printing to PDF file
Left Margin : 25 * 6000 / 254 = 590
Right Margin : 10 * 6000 / 254 = 236
Top Margin : 10 * 6000 / 254 = 236
Bottom Margin : 10 * 6000 / 254 = 236
Report Print area ( Report.SetPageSize ( cx, cy ) ) Portrait orientation
cx = (PageWidth - LeftMargin - RightMArgin (mm)) * 6000 / 254
= ( 210 - 25 - 10 ) * 6000 / 254 = 4133
cy = (PageHeight - TopMargin - BottomMargin (mm)) * 6000 / 254
= ( 297 - 10 -10 ) * 6000 / 254 = 6543
For Landscape orientation use Report.SetPageSize ( cy, cx )
Margin Calculation when printing to Printer
This is My observation with some of the PCL Printers. May be different with your printer.
Checked with Ricoh, Minolta, Samsung laser printers.
Value 4 may be different for different printers.
Report Margins ( Report.Margins ( TopMargin, LeftMargin )
TopMargin = ( Top margin - 4 ) * 6000 / 254
= ( 10 - 4 ) * 6000 / 254 = 142
LeftMargin = ( Left Margin - 4 ) * 6000 / 254
= ( 25 - 4 ) * 6000 / 254 = 496
With these settings you will get Correct margins and print area on the paper.
Getting Print area in the center of the printed page.
Use the same calculation as above to get your Print Area.
Do not set Margins. Page margins to be 'NULL'
Your document will be printed on center of the page

|
